Profibus Displacement Sensor: Diagnostics and Terminating-Resistor Traps
Profibus displacement-sensor faults are worked as physical layer, address/config, then internal diagnostics. Profibus site faults have an empirical distribution: physical-layer problems far outnumber configuration problems, and among physical-layer problems terminating resistors and screen earthing again take the bulk. The correct diagnostic order is first to confirm the physical layer (termination, topology, screening, A/B polarity), then to look at station-address and configuration consistency, and only last to read diagnostic telegrams to locate an internal device fault. This article gives an executable troubleshooting path. The corresponding product is Series 195 Profibus; the physical principle of termination matching is in terminating resistors and bus length. A particular point: the Profibus DP termination network is not the same thing as CAN’s single 120 Ω resistor. It is a three-resistor bias network of 390 Ω pull-up + 220 Ω matching + 390 Ω pull-down; the resistance measured is different as well. Figures are given below.
Terminating resistors: two pitfalls peculiar to Profibus
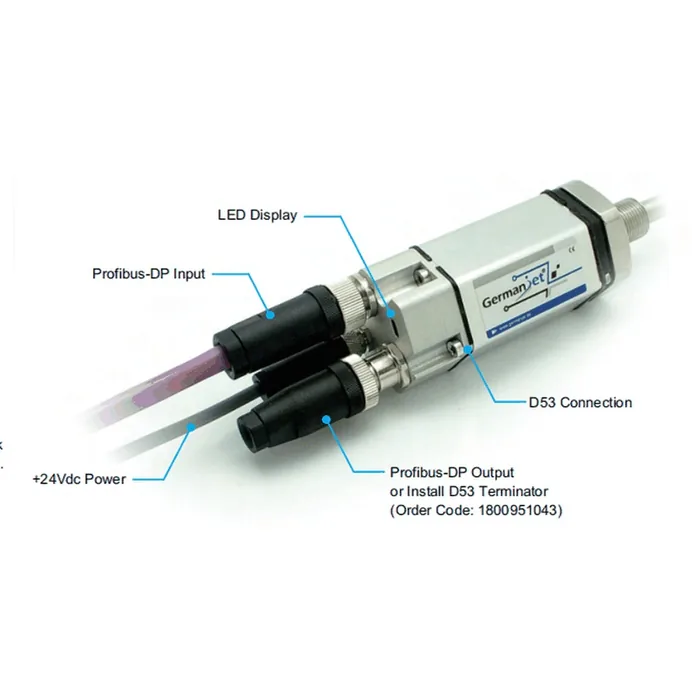
Profibus termination matching is integrated in the standard DB9 plug and switched by a slider on the plug. The rule is plugs at both ends of the segment ON, all intermediate plugs OFF. It looks simple; on site there are two dedicated traps:
- The terminating device must be powered. The Profibus termination network is not a single resistor; it also contains pull-up/pull-down bias resistors, and needs the plug to take power from the device to establish the correct idle level. Once the device set ON is powered off, matching and bias of the whole segment fail together, appearing as whole-network communication that comes and goes. Habitually powering off the end device during maintenance is the most common trigger of this class of fault.
- “One extra ON” is more hidden than “one missing”. If an intermediate plug is set ON by mistake, the bus has three matching points and signal amplitude is pulled down. At short distance and low rate it may still communicate; once the rate is raised or the line lengthened, frames start to be lost — a typical “it always used to be fine” fault.
A quick judgement method: with power off, measure resistance between the A and B wires. The network built into a Profibus DP plug is a 390 Ω / 220 Ω / 390 Ω three-resistor bias termination network. The matching resistor is 220 ohm, not 120 ohm; about 110 ohm with power off means both ends are ON, and the device holding the ON plug must stay powered. The matching resistor between A and B is 220 Ω, not the 120 Ω of CAN. Read it as follows:
| A–B resistance, power off | Judgement | Treatment |
|---|---|---|
| About 110 Ω (two 220 Ω in parallel) | Both-end termination already ON; normal | No action needed |
| About 220 Ω | Only one end ON | Set the slider ON at the missing end |
| Clearly below 110 Ω | An intermediate node is also ON; over-matched | Keep only the physical ends; all intermediate OFF |
| Nearly open (several hundred ohms or more, or unstable) | Neither end ON, or a cable core broken | Set ON first and remeasure; if still abnormal, check the cable |
Note: the bias resistors only act when the device holding the terminating plug is powered, so a resistance measurement with power off can only judge whether the matching resistors are a pair, not whether bias is effective. Measurement must be made with power off, and one end plug should be disconnected to avoid other devices in parallel affecting the judgement.
Topology, polarity and screening
Topology must be linear. Profibus does not allow star branches or long stubs; at a high rate any branch produces reflections. On site, “taking a cable off the middle to save trouble” is a common cause of large-scale dropped stations after a speed-up.
A/B polarity must not be reversed. After an RS-485 differential pair is reversed, in most cases the whole segment cannot communicate; in a few cases short-distance send and receive still just about work, forming an intermittent fault that is extremely hard to locate. Wire strictly by plug-terminal numbers; do not judge by wire colour — colour definitions of cables from different manufacturers are not unified.
The screen must be bonded reliably at both ends to the metal plug shell and the equipment earth, and equipotential bonding among cabinets along the run must be assured. Earthing the screen at one end only is hard to suppress common-mode interference effectively on Profibus high-frequency signals; but double-end earthing in turn requires equipotential bonding to be in place, otherwise earth current is introduced. The full choice of earthing scheme is in troubleshooting fieldbus interference: grounding, shielding, topology; the basic principle of electromagnetic compatibility is in EMC: why strong magnetic fields disturb measurement.
Diagnostic telegrams: what the master can see
A Profibus DP slave cannot report on its own initiative, but it carries diagnostic data when polled. The master side can usually obtain three classes of information: station status (whether ready, whether parameters have been accepted, whether the configuration matches), identifier-related diagnostics (which module has a problem), and device-related diagnostics (manufacturer-specific internal fault codes). Engineering practice is to bring slave diagnostics into the PLC alarm logic, rather than only looking at them by hand in the configuration software.
| Phenomenon / diagnostic prompt | Common cause | Troubleshooting action |
|---|---|---|
| Slave never comes on-line | Station address inconsistent / GSD mismatch / A and B reversed | Check DIP switches against the configured address; confirm GSD model and version; swap A/B as a retest |
| Configuration fault (Cfg_Fault) | Selected data module does not match the actual device | Reselect the module; confirm input byte length |
| Parameter fault (Prm_Fault) | User parameter out of range (for example an unsupported resolution grade) | Reset user parameters within the GSD-allowed range |
| Intermittent dropped stations on the whole network | Terminating resistor missing/extra, end device powered off | Measure A/B resistance with power off; confirm that the device set ON is powered |
| Frames start to be lost after a speed-up | Cable length exceeds what that rate allows / stubs present | Retest one rate grade lower; remove branches and restore a linear layout |
| Occasional drop-out of a single station | Poor connector contact / poor screening of that section / water ingress | Retighten the plug; check screening and protection of that section; see troubleshooting |
| Position-value numbers abnormal but communication normal | Wrong byte-order or resolution-factor conversion | Check the 32-bit data interpretation and the resolution grade |
Segmented location: the most effective site method
When the whole network behaves abnormally and the diagnostic information cannot decide, binary search locates far more efficiently than guessing point by point: open the segment in the middle, fit temporary termination matching at the break, and first let only the front half communicate with the master. If the front half recovers, the problem is in the rear half; then continue the binary split on the rear half. This method can, in a few rounds, narrow the range to a specific device or a specific cable length, and is especially suited to troubleshooting “some unknown node is pulling the whole network down”.
A reminder: temporary opening and fitting of matching must be done with power off, and after restoring the wiring the temporary terminator must be set back to OFF — forgetting to reset it is a common source of a second fault. The general thinking on fieldbus data loss is in fieldbus data loss: terminating resistors / address conflicts / water ingress; configuration basics are in Profibus DP basics: GSD files and configuration; product parameters are in Series 195 Profibus explained.
Practical tips for engineers
- The Series 19 analog programming tool can set the zero and end values anywhere within the nominal factory stroke range.
- The Series 19 Profibus simulator can check sensor functions, read magnet positions and diagnostic data, and supports changing the slave address.
Frequently Asked Questions
Q: Where should Profibus troubleshooting start?
Follow the order physical layer, address and configuration consistency, then internal device diagnostics. First confirm terminating resistors, topology, screening and A/B polarity, then check station address and GSD configuration, and only last read device diagnostic telegrams. Skipping the first two steps and going straight to fault codes usually doubles the effort.
Q: What happens if too many terminating resistors are fitted?
An intermediate node set ON by mistake produces over-matching. After paralleling, the total load impedance is too low, the driver’s load capability is pulled down and signal amplitude is insufficient. At short distance and low speed communication may still work; once the rate is raised or the line lengthened, frames start to be lost — a typical hidden fault.
Q: Why does the whole network become unstable as soon as the end device is powered off?
The Profibus termination network is not only resistors; it also contains pull-up and pull-down bias resistors that need power from the device to establish the correct idle level. After the device set ON is powered off, matching and bias of the whole segment fail together, appearing as communication that comes and goes.
Q: What happens if Profibus A/B wires are reversed?
In most cases the whole segment cannot communicate; in a few short-distance scenes send and receive still just about work, forming an intermittent fault that is extremely hard to locate. Wiring should correspond strictly to plug-terminal numbers; do not judge by cable colour, as colour definitions from different manufacturers are not unified.
Q: What if the whole network is abnormal and the cause cannot be seen?
Use binary search to locate by segment: with power off, open the segment in the middle, fit temporary termination matching at the break, and first let the front half communicate with the master. If it is normal, the problem is in the rear half; then continue the binary split. When restoring the wiring, the temporary terminator must be set back to OFF.
Related Products
Related Applications
Multi-Industry Application Cases for Magnetostrictive Displacement Sensors
View Details
Series 19D Split-Type Process Displacement Sensor Application Cases
View Details
Series 19H Cylinder-Integrated Process Displacement Sensor Application Cases
View Details